Op Art Lesson Plan.
Unit theme: Op Art (Optical Illusions)
Lesson: Marker or Colored pencil drawing of Op Art
Integrated subject: Math
Level: 4
Projected Time: 30 minutes
Lesson: Marker or Colored pencil drawing of Op Art
Integrated subject: Math
Level: 4
Projected Time: 30 minutes
Lesson Overview.
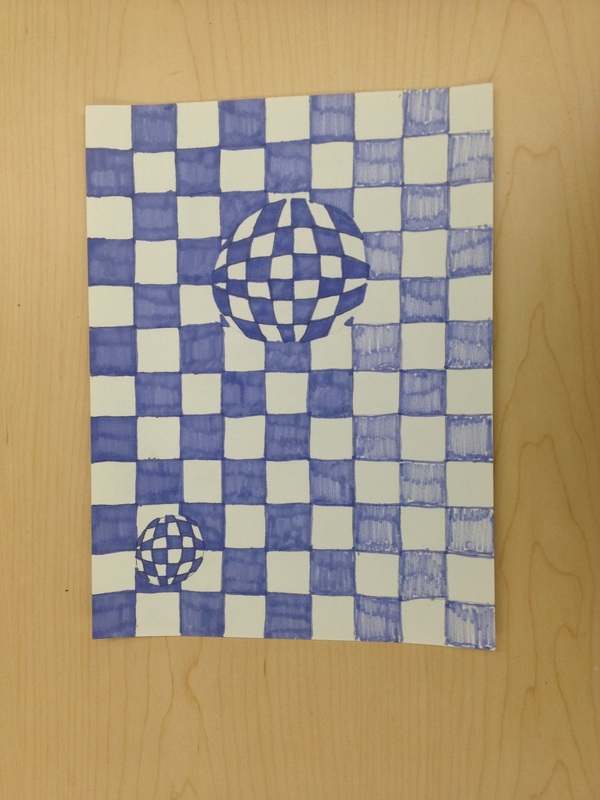
With the use of colored pencils, markers, and rulers, students will use variations of line and measurement to create an Op Art drawing. Alternating between colors will create a pattern that portrays an optical illusion. They will learn about measurement and circles. When finished, students should have created an image portraying 3-D spheres on a 2-D paper.
Materials.
- One sheet of white 80 drawing paper 9''x12'' per student
- Pencil to outline/trace
- Eraser
- Ruler
- Colored pencils and/or markers
- OPTIONAL:
- 7 sheets of card stock to create templates of different sized circles
Image of Teacher Exemplar.

Visual Culture Component.
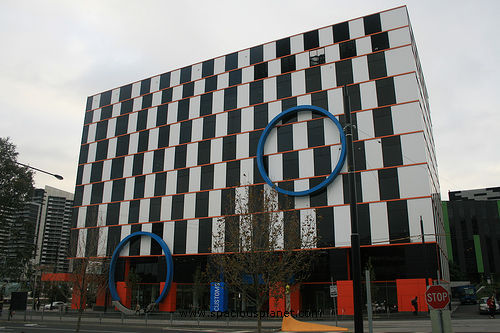
Op Art can be found in your everyday life, sometimes without notice. Some architects choose to use an Op-Art style when creating structures. If students have seen any of these they can relate to or share their experiences. Some students may have been previously exposed to optical illusions.

|
|
Vocabulary.
- Parallel: (adjective) Lines that are side by side having the same distance continuously between them.
- Perpendicular: (adjective) Two straight lines that intersect to create a 90° angle.
- Positive space: The space occupied by the form of the subject itself.
- Negative space: The space around and between the subject or image.
- Optical Illusion: An experience of seeming to see something that does not exist or that is other than it appears.
- Geometric shape: a shape that has clear edges; created by humans generally.
- Organic shapes: shapes found in nature; have a flowing a curving appearance.
South Carolina Standards Addressed.
Art Standards (2010):
|
Math Standards (2007):
|
http://ed.sc.gov/agency/se/Instructional-Practices-and-Evaluations/document s/AcademicStandardsforVisualArts.pdf
http://www.corestandards.org/Math/Content/4/MD
http://www.corestandards.org/Math/Content/4/MD
Objectives.
- The students will compare different optical illusions.
- The students will be able to use a ruler to correctly create one inch columns and rows.
- The students will be able to differentiate between positive space and negative space.
- The students will know the difference between parallel and perpendicular lines.
- The students will correctly follow the pattern designed, creating the optical illusion of a spherical ball on a 2-D sheet of paper.
- Students will design a pattern, which will create an optical illusion.
Procedure.
- Research Op Art, Op Artists, and Optical Illusions. (Prior to lesson)
- Discuss with students what optical illusions are and present to them different examples. Use this time to show different pieces of Op-Art that easily trick the eye. Students may discuss with each other what they see or guess as a class what the visual misconception may be. (5 minutes)
- Introduce Bridget Riley and present examples of her work to students. Talk with students about the different styles of lines she chose to use in her work. (Could use Line poster here). Point out the different geometric and organic shapes used in her artwork. (5 minutes)
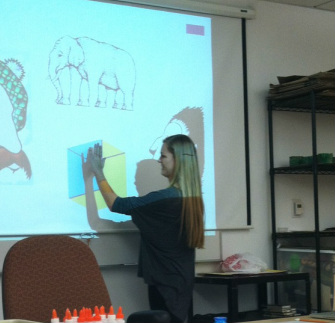
- Introduce art activity by showing teacher exemplar to students an briefly stating what you will be doing.
- Pass out one 9''x12'' sheet of paper to each student. Pass out pencils and erasers to each student, as mistakes or errors are commonly made. Walk around with bucket of markers and allow students to choose one or two colors they want to work with. Pass out one ruler to each student. (3 minutes)
- Instruct students to draw 2 or 3 circles on their sheet of paper, varying in size. (2 minutes)
- Have students use a ruler to measure 1 inch distances along each side of the paper. Create hash marks at each inch as a place holder. Once students have each edge lined in 1 inch hashes, use the ruler to connect the lines both horizontally and vertically. (Students should end up with 12 columns and 9 rows). (3 minutes)
- Direct students focus back to their circles. Students should now be instructed to divide the first circle into 4 equal sections (4 pizza slices). Have students repeat this step for the rest of their circles. (1 minute)
- Now that each circle is divided, have students create their arced lines on all 4 sides of the divided circle. (See example below). (3 minutes)

- Teacher should check off students' work to make sure all lines align and boxes are correctly drawn. At this time, markers or colored pencils should be distributed. (Helpful hint: Make sure the marker is not low on ink or that you have more of the same color because one pen color will need to make it through the whole project).
- Inform students (as a whole) that it may be easier for them to pre-label each box with a colored dot or x mark to indicate what color the box should be before they begin filling them in.(1 minute)
- Have each student bring their work and marker to their desk and begin filling in their Op-Art drawing. This will be the most time consuming segment of the lesson. (15 minutes)
- Once each student is completed with their drawing and coloring, have them choose a background color of paper to mount their artwork on. This color should compliment their art and really make it 'POP'!
- Clean up procedures should be fairly quick. Students need to make sure their caps are on their pens and their rulers are placed back into the bucket. If using washable pens, students should wipe down any marks they may have have gotten on their desktops. (2 minutes)
Artist Connection.
Bridget Riley
Bridget Riley may be considered the 'mother of Op-Art'. She was born in 1931, and her artwork started to be recognized in the mid-1950's. From here she began to be very successful with her work. Birdget is still alive today.
Bridget Riley may be considered the 'mother of Op-Art'. She was born in 1931, and her artwork started to be recognized in the mid-1950's. From here she began to be very successful with her work. Birdget is still alive today.


|


|
Evaluations.
- Student's circles are round and neatly drawn.
- Student's horizontal and vertical lines are straight and parallel to one another (use of straight edge).
- Student has correctly completed the 'fill-in' portion of drawing, alternating polygon shapes.
- Student added color to their artwork, using either black (traditional) or another color.
- Student's work appears to have taken time and focus (craftsmanship).
- Student had correctly created a 3D sphere.
Examples of student work .

|
|
Resources for Motivation:
Helpful Hints!!
- This lesson can be altered to better fit different grade levels.
- For younger grades, teachers may want to create different sized circle templates out of card stock that your students could use to trace onto their own piece of paper.
- If you feel comfortable teaching your students to use a compass, then this could be a great way to incorporate another math standard into your lesson. The compasses will help students draw precise circles and arcs in their Op-Art pieces.
- If students struggle with the color pattern, a good teaching tip here is to draw an x or a dot on the correct color in each box before beginning to color each square in.
- Bridget Riley generally works in black and white, but for more fun and extra learning, you can allow students to use complimentary colors in their Op-Art drawings!
Reflection.
I thought that my lesson went very well. My main concern with this lesson is that it takes longer than expected to complete. In the 30 minutes I had to teach this, students did not finish their work. It maybe helpful to separate this into a 2-day art project, and split the time evenly. Although my students did not have time to finish their art projects, some were very excited to finish and chose to stay after class and spend extra time to finish their Op Art projects. Looking back on the lesson, I am very content with the student engagement. While introducing the lesson on a powerpoint, students were involved in the discussion and loved the powerpoint slides showing optical illusions. These were fun and creative and students were fascinated with this type of art.
